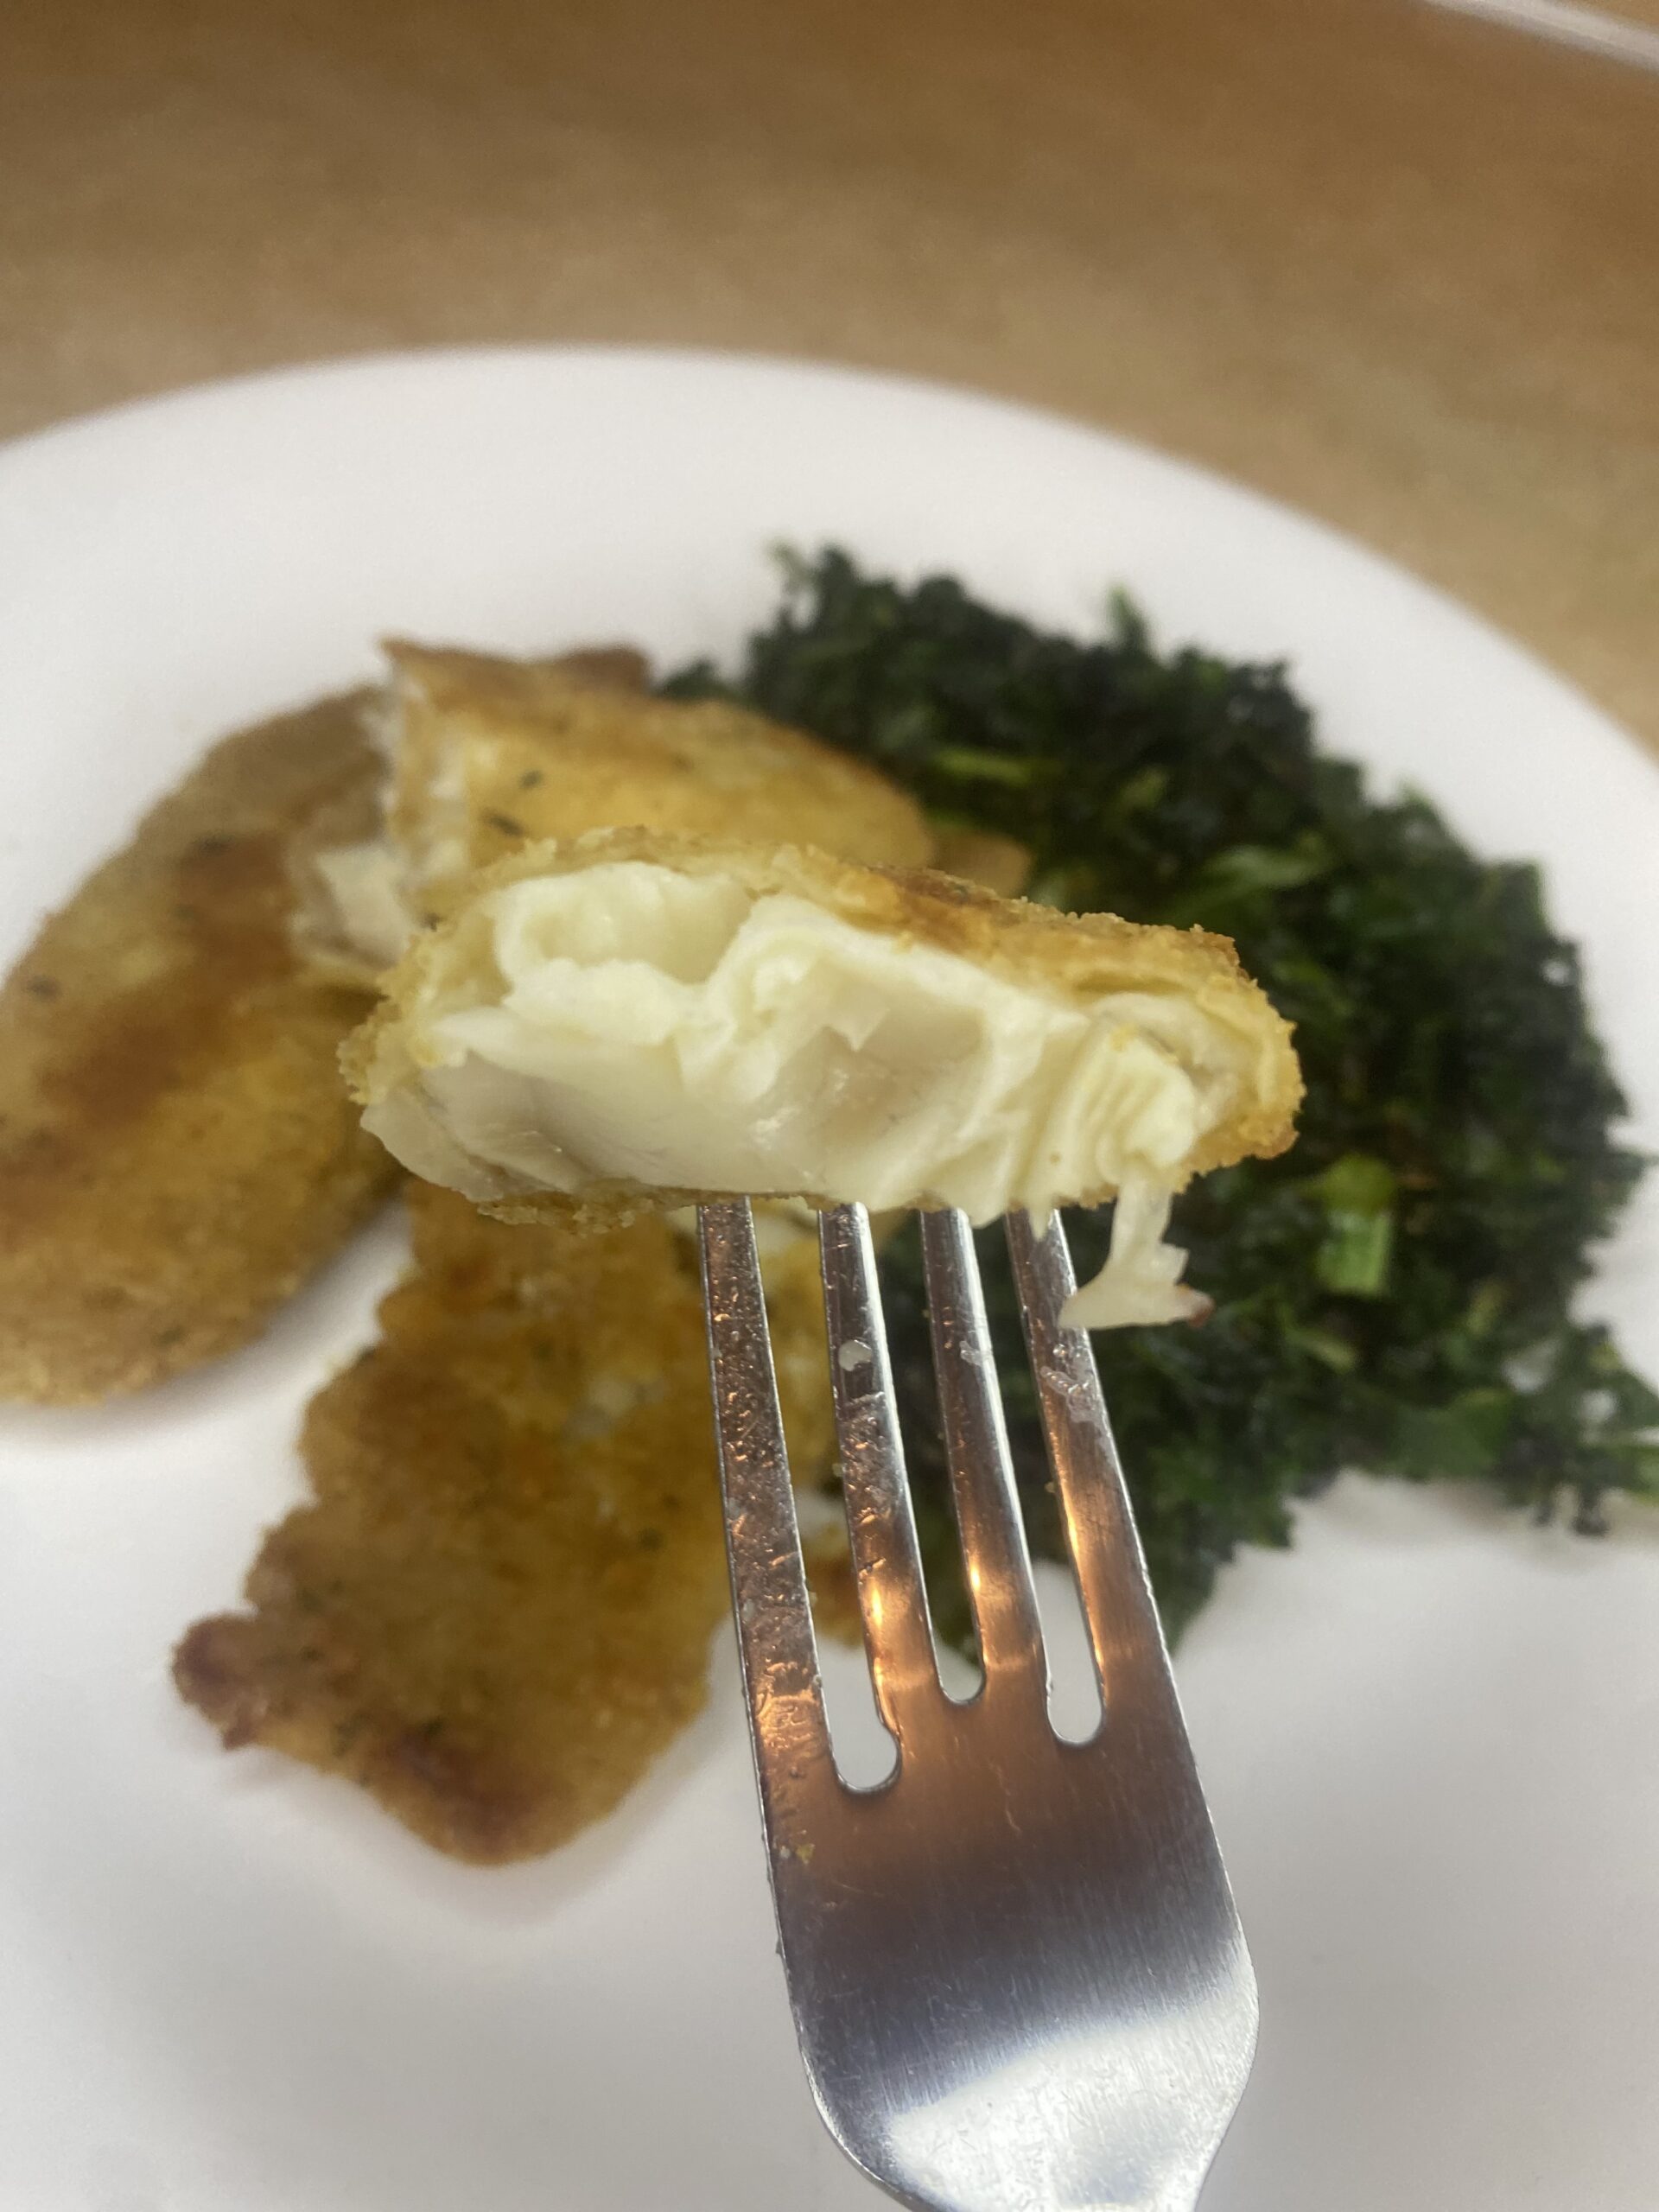
Recipe Index

One Pot American Goulash

American Goulash

This American Goulash recipe is just a variation of the popular Hungarian dish that typically uses stew meat and has more vegetables.

Don’t let the simplicity of this recipe fool you! Although this dish uses cheap ingredients, it is packed with flavor!

If you want to save a little time, you can boil the macaroni in a separate pan while cooking the ground beef, but why dirty more dishes just to save 10 minutes?

It’s hearty and filling alone, but homemade bread or dinner rolls are a great side. Other great options would be a simple salad or vegetables such as corn or green beans.

Goulash can typically be stored in the refrigerator for up to 3 to 4 days or in the freezer for up to 3 months.

Ready for another one pot dinner? Try Hearty Chili with Beans.

American Goulash in a Wooden Spoon

American Goulash

Hearty, one-pot meal of ground beef, pasta, and veggies. Cheap, simple ingredients make this dish a weeknight go-to.
Prep Time 10 minutes
Cook Time 30 minutes
Course Main Course
Cuisine American
Servings 8

Equipment

  • Dutch oven

Ingredients
  

  • 2 cups elbow macaroni
  • 2 lbs. lean ground beef
  • 1 onion, finely chopped
  • 4 cloves garlic, minced or finely chopped
  • 2 15 oz. cans tomato sauce
  • 2 14.5 oz. cans diced tomatoes (petite diced works best)
  • 2 cups beef broth
  • 1 cup water
  • 3 Tbs. Worcestershire sauce
  • 2 Tbs. Italian seasoning
  • 1 Tbs. salt
  • ½ Tbs. black pepper

Instructions
 

  • In a Dutch oven, brown ground beef with salt and pepper. Add onion and garlic and cook until translucent. If not using LEAN ground beef, drain. Do not rinse!
  • Add remaining ingredients except the macaroni. Cook just to boiling, then add the macaroni. Cover with lid and reduce heat to a simmer.
  • Cook covered, for 15 to 20 minutes. Check at 15 minutes to make sure macaroni is done.
  • Finish with grated Parmesan or Romano cheese.
  • Enjoy a hearty meal while knowing you only have to wash one pan!
Keyword beef, Pasta

Cuban Sliders

Cuban Sliders Close Up

If you’re looking for a super easy meal that’s also great as a leftover then look no further. These Cuban sliders are it!!

They’re easy to make and can feed a whole crowd. This is also a great recipe if you need to make something ahead of time. Just assemble everything except the sauce and keep refrigerated until you’re ready, then pour over the sauce and bake.

There’s not a whole lot of important things to remember when making these, just make sure you use a very sharp knife when cutting the rolls.

This recipe is slightly adapted from https://houseofyumm.com/cuban-sliders/

Cuban Sliders Close Up

Cuban Sliders

Hot ham and cheese sandwiches with banana peppers and a Dijon mustard spread. Perfect for potlucks or feeding a crowd!
Prep Time 5 minutes
Cook Time 25 minutes
Course Appetizer
Servings 12

Ingredients
  

  • 24 pack Hawaiian sweet rolls
  • 1 lb. sliced ham lunch meat
  • 8 slices swiss cheese
  • cup sliced banana peppers
  • 2 TBS minced onion (could use grated, if preferred)
  • ½ c butter, melted
  • 2 TBS Dijon mustard

Instructions
 

  • Preheat oven to 325F.
  • Grease a 9×13" baking pan and set aside.
  • Cut the Hawaiian rolls in half by removing the top.
    Slicing King's Hawaiian Rolls with Bread Knife
  • Place the bottom half of the rolls in the pan and layer meat, cheese, then the banana peppers. Replace top half of bread.
  • Combine onion, melted butter, and Dijon mustard in a small bowl. Pour over the top of sandwiches.
  • Cover with foil and bake for 15 minutes. Remove foil and bake and additional 10 minutes.
  • Cut into individual sandwiches and enjoy!
    Cuban Sliders Serving Suggestion
Keyword 30-minutes or less, Sandwiches

$5 Milkshake Recipe

Today, we are paying tribute to one of the best movies of the ’90’s…Pulp Fiction!! It’s actually my favorite movie right up there with Forrest Gump and Dazed and Confused. Because for me, it’s all about that soundtrack, baby!!

I’m not gonna go through the whole movie, but I will tell you that the plot consists of four different tales that are seemingly unrelated, but ultimately entwined together. I will warn you that it is non-linear, so if you are like me, you may have to watch it more than once to really get it. One of the most iconic scenes is the dinner date between Vincent and Mia. It is there in that ’50’s retro diner that pop culture history was made.

Trust me! Just go watch it…

This recipe is only two ingredients…just milk and ice cream.  Simple, right?  I’ve compiled a few tips to help you get the perfect milkshake.

Tip #1 Don’t skimp on your ice cream! The ice cream is the main character so make sure to choose the highest quality available. It’s also better to go with a full fat flavor, as well. This will ensure you get a thick and creamy texture.

But I’m not the milkshake police!! You can use a low-fat flavor or even frozen yogurt, just know that the end product is going to be thinner.

Tip #2 Use full-fat milk. Just like with the ice cream, a lower fat milk is going to create a thinner consistency. A lower fat milk is also going to create more ice within the milkshake, as well.

Tip #3 Let your ice cream soften. Let me repeat that…soften, not melt. Set your ice cream on the counter for about 10 to 15 minutes before you make your milkshakes. Your blender will thank you for it.

Tip #4 Don’t be shy when it comes to topping off your milkshake. Whipped cream and cherry is so classic, but just about any ice cream topping will do. Try mixing it up with some fine espresso powder for your next coffee fix or make it a little boozy with some bourbon or rum. Get creative!

Tip #5 Don’t overblend. Be cautious not to overblend the milkshake, as this can lead to a thin and watery consistency. Blend just until all ingredients are combined and the shake is smooth.

What do you like on your milkshake??

$5 Milkshake Recipe

Thick and creamy basic milkshake. Start with recommended ratio of ice cream to milk and adjust for preferred thickness. Enjoy!
Prep Time 5 minutes
Servings 1 shake

Equipment

  • Blender

Ingredients
  

  • 2 cups ice cream
  • ½ cup milk any percentage

Instructions
 

  • In a blender, combine ice cream and milk.
  • Pour into glass. Top with whipped cream and cherry, if desired.
Keyword beverages, dessert, milkshake

The Best Banana Bread Recipe

sliced banana bread

This banana bread is so moist and fluffy. The streusel-nut topping makes it sweet enough to eat for dessert. It pairs well with a cup of coffee and can be eaten on its own or spread with butter or cream cheese. The natural moisture from the ripe bananas contributes to the bread’s soft and tender texture.

When making this recipe, there’s just a few things you want to remember…

Tip #1 You want to make sure you are using very ripe bananas. In fact, the riper the better. You can make your bananas ripen quicker by storing them in a paper bag or you can bake them with peels on in a 300 degree oven for about 20 minutes.

Tip #2 Another important thing to remember is to thoroughly mash your bananas before adding them into your other wet ingredients. Mashing them helps to incorporate the banana flavor throughout your bread.

Tip #3 Don’t overmix your dough. When adding your wet and dry ingredients together, it’s important to mix just until moistened. The dough will be lumpy, but if you’ve sifted your flour (which I recommend doing every time you’re baking), you shouldn’t have to worry about those pesky clumps. So don’t overmix. The more you mix, the more gluten develops which leads to a dense, rubbery loaf.

Tip #4 Wrap and store overnight before slicing. You never want to slice banana bread when it first comes out of the oven. After baking, allow pan to cool on a wire rack, then remove bread from pan. Cool completely on wire rack. Wrap in plastic wrap and let sit overnight. This will ensure clean, easy slicing.

Ready for another Fall inspired dessert?  Try this Double Layer Pumpkin Pie.

The Easiest Banana Bread

Banana Bread

Sarah Sexton
Classic Banana Bread with Streusel-Nut Topping
Prep Time 25 minutes
Cook Time 55 minutes
Course Bread
Servings 16 slices
Calories 215 kcal

Ingredients
  

  • 2 cups all-purpose flour
  • 1 ½ teaspoons baking powder
  • ½ teaspoon baking soda
  • ¼ teaspoon salt
  • teaspoon ground nutmeg
  • 2 eggs, beaten
  • 1 ½ cups mashed ripe banana about 5 medium
  • 1 cup sugar
  • ½ cup melted butter can use cooking oil or margerine
  • ¼ cup chopped walnuts

Streusel-Nut Topping

  • ¼ cup packed brown sugar
  • 3 tablespoons all-purpose flour
  • 2 tablespoons butter
  • cup chopped walnuts

Instructions
 

  • Streusel-Nut Topping: In a small bowl combine 1/4 cup packed brown sugar and 3 tablespoons of flour. Cut in 2 tablespoons of butter until mixture resembles coarse crumbs. Stir in 1/3 cup chopped walnuts and set aside.
    Mixing streusel-nut topping
  • Preheat oven to 350F. Grease bottom and sides of a 9x5x3-inch or two
    7 1/2x3 1/2x2-inch loaf pans and set aside.
  • In a large bowl, combine flour, baking powder, baking soda, salt, cinnamon, and nutmeg. Make a well in the center and set aside.
    Making a well in flour mixture
  • In a medium bowl, combine eggs, bananas, sugar, and oil. Add egg mixture all at once to flour mixture. Stir just until moistened (Don't overmix).
    lumpy batter in mixing bowl
  • Fold in walnuts. Spoon batter into prepared pans. Sprinkle Streusel-Nut Topping over batter in pan(s).
    Banana Bread before baking
  • If you are using a 9x5x3-inch pan, bake for 55 minutes to 1 hour. Bake about 40 to 45 minutes for two loaf pans.
  • Cool in pan on wire rack for 10 minutes, then remove from pan and cool completely. Wrap and store overnight before slicing.
    Banana Bread after baking
Keyword Banana, banana cake, bread, breakfast, sweet bread