Recipe Index

Corned Beef Brisket in the Oven

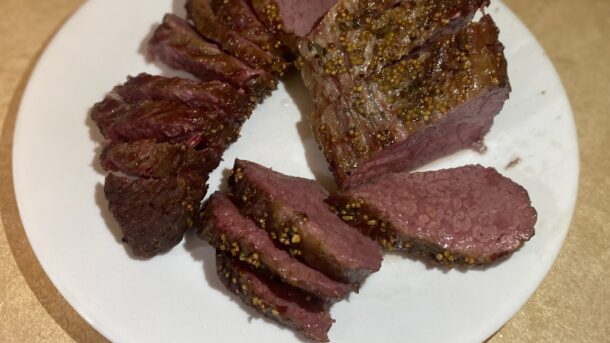
Corned Beef Brisket on Plate.

Have you ever bought a Corned Beef Brisket from the store and wondered if you can cook it in the oven instead of on the stove? Well, you can and the flavor is so much better! When you cook Corned Beef Brisket in the Oven, the meat gets a crispy coating and is still SO tender.

What type of beef brisket are you looking for?

  • Point Brisket: Because of its higher fat content, the point brisket is well-suited for slow cooking methods such as smoking or braising. It benefits from long, slow cooking to render the fat and break down the collagen, resulting in tender, flavorful meat.
  • Flat Brisket: The flat brisket is often used for dishes like corned beef or sliced for barbecue. It can be cooked using methods such as smoking, braising, roasting, or even sous vide to ensure tenderness.

So the Flat Brisket is better for this dish, but since I waited too long to purchase one before St. Patrick’s day, we’re going to be using a Point Brisket today 🍀🌈🍺

Try it with a side of Irish Colcannon.

A few things to remember…

  1. Rinse the corned beef brisket under cold water to remove any excess brine or seasonings from the packaging. Pat it dry with paper towels.
  2. Trim the fat cap to about 1 inch thick. You don’t want too much fat, but leaving some adds to the flavor.
  3. Place the brisket, fat side up, on a rack in a roasting pan or baking dish that’s large enough to accommodate it comfortably.
  4. Pour enough water to reach the bottom of the brisket. You don’t want too much because that will cause a “boiled” flavor and that’s what we’re trying to get away from.
  5. Rest the brisket for about 15-20 minutes before slicing so that the juices will reincorporate into the meat.
  6. Slice the brisket against the grain into 1/8 to 1/4 inch slices.
  7. Store in the refrigerator for 3 to 4 days or freeze up to 3 months.
Corned Beef Brisket on Plate.

Corned Beef Brisket in the Oven

Corned Beef Brisket in the Oven is tender, flavorful, and perfect for celebrating St. Patrick's Day or any time you're craving a comforting meal.
Course Main Course
Cuisine Irish

Equipment

  • Roasting pan with rack

Ingredients
  

  • 6 lb. Corned Beef Brisket with Seasoning Packet
  • water

Instructions
 

  • Preheat the oven to 325F. Put a grate (roasting rack) in the bottom of a roasting pan or baking dish large enough to hold the meat.
  • Rinse the corned beef to remove packing. Pat it dry with a paper towel.
  • Trim the fat cap and place meat fat side up on roasting rack. Fill the bottom of the pan with enough water to reach the rack. Be careful NOT to submerge the meat in the liquid.
  • Cover the pan with a lid or aluminum foil. Bake the meat covered for 2 hours. Remove the lid and roast for an additional 1 hour or until an internal temperature of 185F is reached.
  • Remove from the oven and allow meat to rest for 15-20 minutes. Slice and serve.
Keyword Beef Brisket, Corned Beef Brisket

Irish Colcannon

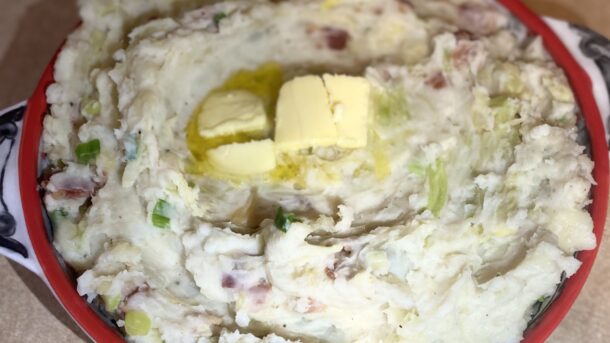
Irish Colcannon

Colcannon is a traditional Irish dish made with mashed potatoes, cabbage or kale, butter, milk, and green onions. It’s a comforting and hearty dish that is often served as a side dish, particularly during colder months or as part of a St. Patrick’s Day meal. I personally could eat it year round and may or may not be known for making a huge batch and eating on it multiple times a year.

The mashed potatoes form the base of colcannon, providing a creamy and fluffy texture. Butter and warm milk are added to the mashed potatoes to enhance their richness and creaminess. The cabbage component of colcannon adds a savory and slightly sweet flavor, as well as a bit of texture. The cabbage is finely shredded and cooked until tender, then mixed into the mashed potatoes.

Overall, colcannon is a simple yet delicious dish that combines the comforting elements of mashed potatoes with the flavor of cabbage, resulting in a satisfying and hearty side dish that pairs well with a variety of main courses, such as this Corned Beef Brisket in the Oven.

Some tips for the perfect Colcannon…

  1. Choose the right potatoes: Use starchy potatoes like Russets or Yukon Golds for the fluffiest, creamiest mashed potatoes.
  2. Balance the cabbage and potatoes: Aim for a good balance between the amount of cabbage and potatoes. Too much cabbage can overpower the dish, so adjust according to your taste.
  3. Cook the cabbage properly: If using cabbage, finely shred it and cook it until tender. Check out our recipe for perfect Southern-Fried Cabbage.
  4. Add dairy: Incorporate butter and milk into the mashed potatoes for richness and creaminess. Warm the milk and melt the butter before adding them to the mashed potatoes to prevent the dish from cooling down too much.
  5. Serve hot: Colcannon is best served hot, straight from the pot. If you need to reheat it, do so gently over low heat to prevent it from drying out.
Irish Colcannon

Irish Colcannon

Colcannon is a traditional Irish dish made with mashed potatoes, cabbage or kale, butter, milk, and green onions. It's a comforting and hearty dish that is often served as a side dish, particularly during colder months or as part of a St. Patrick's Day meal.
Prep Time 10 minutes
Cook Time 30 minutes
Total Time 40 minutes
Course Potatoes, Side Dish
Cuisine Irish
Servings 6

Ingredients
  

  • 3 lbs. Potatoes, peeled and quartered (Preferably Russet or Gold)
  • ½ cup heavy cream or whole milk
  • 1 medium yellow onion, diced
  • 4 slices bacon, cut into pieces
  • ½ head of green cabbage
  • 4 tbsp unsalted butter
  • 1 clove garlic, minced
  • 1 tbsp salt
  • 1 tsp black pepper
  • ½ tsp onion powder
  • ½ tsp garlic powder
  • 3 green onions, sliced (optional)

Instructions
 

  • Place potatoes in a saucepan covered in water and lightly salt. Bring to a boil over medium-high heat. Reduce the heat and simmer for 15-20 minutes or until fork tender. (To save some time, begin Step 2 while potatoes are cooking.) Drain well. Return to pan or serving bowl and add butter. Cover with lid and let butter melt before incorporating.
  • In a skillet, fry bacon pieces until crispy. With a slotted spoon, remove bacon pieces from pan. Do not drain off grease! You should have about 3-4 tablespoons of bacon grease. Cook the minced, yellow onion and garlic in the grease until translucent. Add cabbage, then season with salt, pepper, garlic powder, and onion powder. Cook over medium heat until tender or about 7-8 minutes.
  • Mash the potatoes with a potato masher. Combine potatoes with cabbage, bacon, and green onion. Season with more salt and pepper, to taste.
Keyword Colcannon, Irish Colcannon, Potatoes

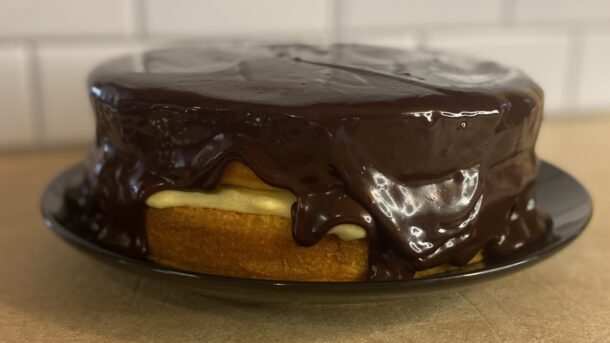
The Easiest Boston Cream Pie

Boston Cream Pie Close Up


Picture layers of delicate sponge cake, moist and tender, gently embracing a velvety pool of rich vanilla custard. Crowned atop this masterpiece is a decadent cloak of glossy chocolate ganache, its deep cocoa notes dancing harmoniously with the delicate sweetness of the custard and the subtle vanilla undertones of the cake. This is the Boston cream pie!

The Boston cream pie has a rich history dating back to the mid-19th century. The Boston cream pie is credited to the Parker House Hotel (now known as the Omni Parker House) in Boston. It is said to have been created by French chef M. Sanzian at the Parker House Hotel in 1856. The original version was more like a sponge cake filled with custard and topped with a chocolate glaze. The cake gained popularity and became a signature dessert of the hotel. For more information on the start of this culinary classic, you can visit the Omni Hotel’s Blog.

A few tips you’ll want to follow when making this delicious creation…

  1. Use High-Quality Ingredients: Since Boston Cream Pie has relatively few components, each ingredient’s quality makes a big difference. Opt for high-quality butter, eggs, flour, chocolate, and vanilla extract.
  2. Allow the Cake to Cool Completely: After baking, let the cake layers cool completely in the pans before removing them. This helps the cake set and prevents it from crumbling when assembling the pie.
  3. Prepare the Pastry Cream in Advance: Pastry cream needs time to chill and set properly. Prepare it ahead of time and allow it to cool in the refrigerator for at least a few hours, or ideally overnight, before assembling the pie.
  4. Make a Smooth Chocolate Ganache: Use good quality chocolate for the ganache and heat the cream just until it starts to simmer before pouring it over the chocolate. Stir until smooth and glossy, then pour it over the assembled cake, allowing it to drip down the sides.
  5. Chill Before Serving: Refrigerate the Boston Cream Pie for at least an hour before serving to allow the ganache to set and the flavors to meld together. This also makes it easier to slice cleanly. Remove the pie from the refrigerator about 20-30 minutes before serving to allow it to come to room temperature slightly.
  6. Temper the Eggs: This is a crucial step in making the pastry cream. By tempering the eggs, you’re going to prevent curdling and ensure your cream has a smooth texture. If you’re a little intimidated by this step, Food Network has a great tutorial here.

With these tips in mind, you’ll be well-equipped to create a delicious Boston Cream Pie that’s sure to impress your family and friends. Enjoy!

Want an even easier dessert? Try Better Boxed Brownies or No-Bake Peanut Butter Cocoa Cookies.

Boston Cream Pie Close Up

The Easiest Boston Cream Pie

A delicious cake filled with creamy custard and topped with chocolate. It's made of soft sponge cake layers with a sweet, creamy center. On top, there's a smooth layer of chocolate ganache that adds a rich and indulgent touch!
Prep Time 15 minutes
Cook Time 25 minutes
Total Time 40 minutes
Course Dessert
Servings 8

Ingredients
  

For the Cake

  • 1 cup all-purpose flour
  • 1 tsp baking powder
  • ¼ tsp salt
  • 4 large eggs, separated
  • 1 cup granulated sugar
  • ½ cup whole milk
  • 1 tsp vanilla extract

For the Pastry Cream

  • 2 cups whole milk
  • 6 large egg yolks
  • ½ cup granulated sugar
  • ¼ cup cornstarch
  • 1 tsp vanilla extract

For the Chocolate Ganache

  • 4 ounces semisweet chocolate (chopped or chips)
  • ½ cup heavy cream

Instructions
 

Ready, set, go!

  • Preheat your oven to 350F. Grease and flour two 9-inch round cake pans.

Make the Cake

  • In a medium bowl, sift together the flour, baking powder, and salt. Set aside.
  • In a large mixing bowl, beat the egg yolks with 3/4 cup of sugar until thick and pale.
  • Gradually add the milk and vanilla extract to the egg yolk mixture, beating until well combined.
  • Gently fold the flour mixture into the egg yolk mixture until just combined.
  • In a separate clean mixing bowl, beat the egg whites until soft peaks form. Gradually add the remaining 1/4 cup of sugar and continue beating until stiff peaks form.
  • Fold the beaten egg whites into the cake batter until evenly incorporated.
  • Divide the batter evenly between the prepared cake pans and smooth the tops.
  • Bake in the preheated oven for 20-25 minutes or until the cakes are golden brown and spring back when lightly touched.
  • Remove from the oven and let the cakes cool in the pans for 10 minutes before transferring them to wire racks to cool completely.

Make the Pastry Cream

  • In a medium saucepan, heat the milk over medium heat until it just begins to simmer. Remove from heat.
  • In a separate mixing bowl, whisk together the egg yolks, sugar, and cornstarch until well combined.
  • Gradually whisk the hot milk into the egg yolk mixture to temper the eggs. (For help with tempering eggs, see tip #6 in above post.)
  • Return the mixture to the saucepan and cook over medium heat, whisking constantly, until thickened.
  • Remove from heat and stir in the vanilla extract.
  • Transfer the pastry cream to a bowl, cover with plastic wrap (making sure the wrap touches the surface of the cream to prevent a skin from forming), and refrigerate until chilled and set, about 2 hours.

Make the Chocolate Ganache

  • Place the chopped chocolate or chocolate chips in a heatproof bowl.
  • In a small saucepan, heat the heavy cream over medium heat until it just begins to simmer.
  • Pour the hot cream over the chopped chocolate and let it sit for a minute.
  • Stir the mixture until the chocolate is completely melted and smooth. Set aside to cool slightly.

Assemble the Boston Cream Pie

  • Place one cooled cake layer on a serving plate.
  • Spread the chilled pastry cream evenly over the top of the cake layer.
  • Place the second cake layer on top of the pastry cream.
  • Pour the chocolate ganache over the top of the cake, allowing it to drip down the sides.
  • Refrigerate the assembled Boston Cream Pie for at least 1 hour to allow the ganache to set.
  • Slice and serve chilled. Pat yourself on the back because you've created a masterpiece!
Keyword Boston Cream Pie, cakes, dessert

Low-Carb Keto Breakfast Cups

Keto Breakfast Cups on Plate

Keto breakfast cups are a delicious and convenient way to enjoy a low-carb, high-fat breakfast. The perfect combination of eggs, meat, cheese, and vegetables make them a great breakfast option for anyone following a low-carb diet. They are versatile and you can customize them with your favorite low-carb ingredients. They can also be made ahead of time and stored in the refrigerator for a quick and easy breakfast throughout the week.

So what’s so great about them?

  1. They’re low in carbs. These Keto Breakfast Cups contain minimal carbohydrates, making them suitable for those following a ketogenic diet that emphasizes low-carb, high-fat intake.
  2. High in Healthy Fats. These ingredients are rich in healthy fats, such as eggs and cheese, which are essential for those on a keto diet.
  3. Customizable. You can easily customize these keto breakfast cups based on your preferences and dietary needs. You can choose a variety of low-carb vegetables, meats, and cheeses to suit your taste.
  4. Convenient and Portable: Keto breakfast cups are easy to prepare in advance and can be stored in the refrigerator. This makes them a convenient, grab-and-go option for busy mornings.
  5. Meal Prep Friendly: You can make a batch of keto breakfast cups at the beginning of the week and store them in the fridge. This helps save time during busy mornings and ensures you have a keto-friendly breakfast readily available.
  6. Nutrient-Rich: Depending on the ingredients you choose, keto breakfast cups can be a good source of essential nutrients such as vitamins, minerals, and antioxidants from vegetables.
Keto Breakfast Cups on Plate

Low-Carb Keto Breakfast Cups

Keto breakfast cups are savory, individual-sized dishes made with ham, eggs, cheese, and vegetables.
Prep Time 5 minutes
Cook Time 20 minutes
Course Breakfast, Keto
Servings 12

Ingredients
  

  • 12 slices lunch meat
  • 8 large eggs
  • ¼ cup heavy cream or almond milk
  • 1 cup shredded cheese (your choice)
  • ½ cup diced vegetables (mushrooms, bell peppers, spinach, etc.)
  • salt and pepper to taste

Instructions
 

  • Preheat oven to 375F and grease a muffin tin with cooking spray or use silicone muffin cups for easy removal.
  • Place one slice of lunch meat in each muffin cup.
  • In a bowl, whisk together the eggs, heavy cream or almond milk, and salt and pepper.
  • Divide the shredded cheese and sliced vegetables evenly among the muffin cups.
  • Use a fork or toothpick to gently stir the ingredients in each cup, ensuring that the egg mixture is well distributed.
  • Bake in the preheated oven for 18-20 minutes or until the eggs are set and the tops are golden brown.
  • Allow the keto breakfast cups to cool for a few minutes before using a knife or spoon to loosen the edges and remove them from the muffin tin.
Keyword 30-minutes or less, breakfast, Keto

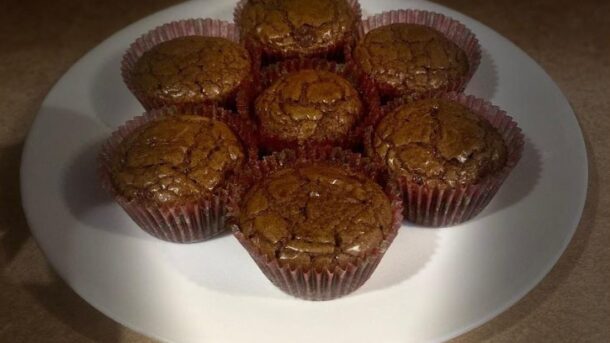
Better Boxed Brownies

Brownies arranged on plate

Everyone loves a good brownie! But…not everyone likes to take the time to make them completely from scratch…myself included. We’d all like to know how to make Better Boxed Brownies! And with a few tricks, it’s easy to take any box of brownie mix to the next level. And the best part is no one will be able to tell.

  1. Use milk instead of water. The milk will help to make the brownies more richer and flavorful. Use can milk, buttermilk, or coconut milk for incredible results.
  2. Use melted butter instead of vegetable oil. Butter meaning real butter…not butter spread or margarine.
  3. Use instant coffee. Adding some instant coffee crystals will help to enhance the chocolate flavor in the brownies.
  4. Add some vanilla. Because why not?!? A splash of vanilla makes everything better.
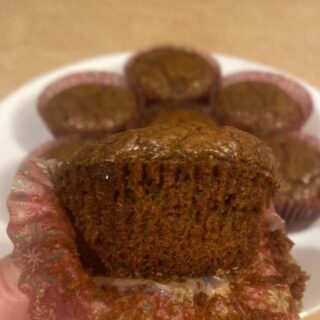
  5. Use a muffin pan. Making brownies in a muffin pan ensures everyone gets an edge piece. Just use cupcake liners and spray with cooking spray.

Ready for another easy dessert? Try these No-Bake Peanut Butter Cocoa Cookies.

Brownies

Better Boxed Brownies

Take boxed brownie mix to the next level.
Prep Time 10 minutes
Cook Time 20 minutes
Course Dessert
Servings 12

Ingredients
  

  • 1 box brownie mix (usually between 16 to 17oz packages)
  • 2 TBS milk
  • 2 eggs
  • ½ cup melted butter
  • 1 TBS instant coffee
  • 1 TBS vanilla extract

Instructions
 

  • Preheat oven to 350F and prepare pan by greasing bottom and sides. If making cupcakes, spray cupcake liners with cooking spray.
  • In a large bowl, combine brownie mix, eggs, milk, melted butter, coffee crystals, and vanilla. Stir just until moist.
  • Pour into prepared pan and bake according to box directions. For cupcakes, bake at 350F for about 20-25 minutes.
Keyword brownies, dessert

No-Bake Peanut Butter Cookies

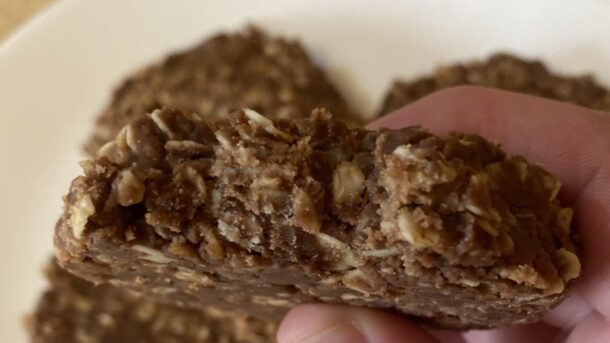
No Bake Peanut Butter Cocoa Cookies

These No-Bake Peanut Butter Cookies really hit home when it comes to satisfying your sweet tooth and aren’t overly rich to the point that you regret what you’ve done. These cookies require no baking, which means they can be made quickly and with minimal effort. You simply mix the ingredients together, portion them out onto a baking sheet, and let them set in the refrigerator. And the best part is that you probably have all of the ingredients in your pantry right now.

Since they don’t require an oven, No-Bake Peanut Butter Cookies are perfect for situations where baking isn’t possible or convenient, such as during hot weather or when you’re short on time.

A few things to remember…

  1. Prep your ingredients ahead of time. Once the mixture begins to boil, things move pretty fast. You don’t want to risk overcooking your mixture and ending up with a dry cookie that crumbles. Take a few minutes before you begin to pre-measure everything so you can work quickly and create a perfect cookie.
  2. If you have a candy thermometer, use it! 230F is the perfect temperature to start your timer. Remember to boil the mixture for one minute. No more, no less.
  3. Remove from heat before adding the peanut butter, vanilla, and oats. You want to aim for a fudge-like texture and the mixture will continue to cook if you don’t remove the pan from heat.
  4. Store in an airtight container. If layering, place a piece of parchment paper between layers. Store in the fridge for up to 3 weeks or freeze for up to 6 months.

Ready for another easy dessert? Try Better Boxed Brownies.

No Bake Peanut Butter Cocoa Cookies

No Bake Peanut Butter Cocoa Cookies

A no-bake cookie packed with oats, peanut butter, and chocolate.
Prep Time 10 minutes
Cook Time 10 minutes
Course christmas cookie, cookies, Dessert
Servings 24 cookies

Ingredients
  

  • 2 cups white sugar
  • ½ cup milk
  • ½ cup unsalted butter
  • ¼ cup cocoa powder
  • 3 cups quick-cooking oats
  • 1 cup creamy peanut butter
  • 1 TBS vanilla extract

Instructions
 

  • In a large pot, whisk milk, butter, sugar, and cocoa powder. Bring to a boil over medium-high heat. Once mixture comes to a boil, set a timer for one minute.
  • Remove from heat and add peanut butter, vanilla, then the oats. Mix well.
  • Place dough by the spoonful on parchment paper or aluminum foil and allow to set for 25-30 minutes. Enjoy!
Keyword cookie, dessert

Hearty Chili with Beans

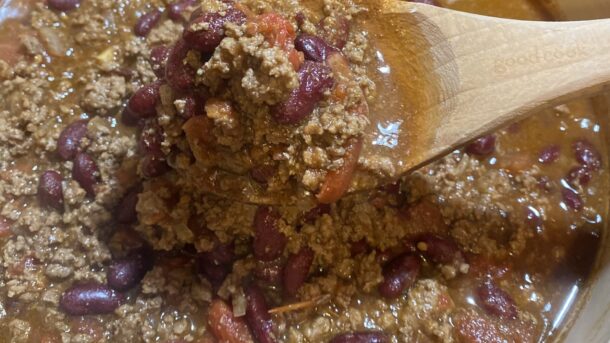
Hearty Chili in Dutch Oven

This dump and go hearty chili is rich and flavorful and is the perfect meal to warm you to the bone. It’s filled with ground beef, kidney beans, diced tomatoes, and just the right amount of spice. It’s mild enough for granny and the kids, but can be adjusted by adding more or less cayenne pepper.

This Hearty Chili is a great option for meal prep because it often tastes even better the next day as the flavors have had time to meld together. You can make a big batch of chili ahead of time and portion it out for easy lunches or dinners throughout the week.

It tastes great served over cornbread, with crackers, or over some corn chips. It’s even hearty and delicious by itself.

The best toppings…

Sour cream: Go ahead and do a dollop

Green onions: Sliced and sprinkled on top

Shredded Cheese: Because…of course!

Jalapenos: Add some heat in there

Avocado: Sliced and piled on top

For storage…

Refrigerate in an air-tight container for 5-7 days or freeze for 2-3 months. If freezing, place in a ziplock and freeze flat for easier storage and a quicker thaw time.

Ready for another quick and easy dinner recipe? Try our American Goulash.

Hearty Chili in Dutch Oven

Hearty Chili

Rich and flavorful chili with ground beef, kidney beans, and diced tomatoes.
Prep Time 15 minutes
Cook Time 15 minutes
Course Main Course
Servings 8

Ingredients
  

  • 2 lbs. lean ground beef
  • ½ yellow onion, diced
  • 2 14.5oz cans of red kidney beans (or whatever beans you like in yours)
  • 2 14.5oz cans diced tomatoes
  • 2 TBSP chili powder
  • 2 tsp cumin
  • 2 tsp garlic powder
  • 2 tsp salt
  • 1 tsp onion powder
  • 1 tsp oregano
  • ½ tsp ground black pepper
  • ½ tsp cayenne pepper (more or less to taste)
  • 2 TBSP Worcestershire sauce

Instructions
 

  • Brown ground beef in a large skillet or Dutch oven. Add onion and cook until translucent. Drain. Do not rinse!
  • Return to pan and add kidney beans, tomatoes, spices, and Worcestershire sauce. Bring to a simmer. Vent lid and cook for about 15 minutes. For richer flavor, cook a little longer on a low simmer.
  • Garnish and serve.
Keyword 30-minutes or less, chili

Double Layer Pumpkin Pie

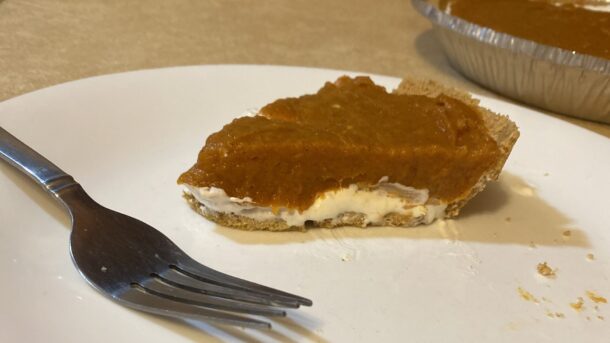
Slice of Double Layer Pumpkin Pie on a Plate

This double layer pumpkin pie is a no-bake classic from Keebler. It’s a combination of creamy cheesecake with the holiday taste of pumpkin.

The original recipe, found here from Keebler.com, calls for one pie crust. I’ve personally always made it into two pies to not only make it go further, but to make it be thinner so it’s easier to serve.

Important things to remember…

When you’re layering the pies, be sure to spread the cream cheese layer and then chill or freeze for at least 30 minutes to avoid the layers becoming mixed together. You want it to be pretty thick before you spread the pumpkin layer. It’s also helpful to chill the pie crust before you start just to make sure it doesn’t try to crumble on you when assembling.

As far as the spices for the pumpkin layer, you can substitute the 2 teaspoons of pumpkin pie spice for 1 teaspoon ground cinnamon, 1/2 teaspoon ground ginger, and 1/4 teaspoon ground cloves.

You can create your own 9-inch pie crust by combining 1 1/2 cups graham cracker crumbs (finely ground) with 1/3 white sugar and 6 tablespoons unsalted butter (melted.)

Ready for another Fall inspired dessert? Try The Best Banana Bread.

Slice of Double Layer Pumpkin Pie on a Plate

Double Layer Pumpkin Pie

A layer of cheesecake and pumpkin on a graham cracker crust. For thicker layers, use one pie crust.
Prep Time 15 minutes
Total Time 4 hours 15 minutes
Course Dessert
Servings 8

Ingredients
  

  • 1 Keebler Ready Crust Graham Pie Crust
  • 4 oz cream cheese, softened
  • 1 tbsp milk (cheesecake layer)
  • 1 ½ cups cold milk (pumpkin layer)
  • 1 tbsp white sugar
  • ¾ cup non-dairy whipped topping, thawed (from the freezer section, such as Cool-Whip)
  • 2 packages vanilla flavor instant pudding and pie filling (4 serving size)
  • 2 tsp pumpkin pie spice
  • 1 15oz can pureed pumpkin

Instructions
 

  • In a medium bowl whisk cream cheese, 1 tablespoon milk, and sugar. Gently stir in whipped topping. Carefully spread into crust. Chill before adding next layer.
  • In a large bowl beat 3/4 cup of milk, pudding mix, and spice with wire whisk for 1 minute. Whisk in pumpkin. Carefully spread over cream cheese layer.
  • Refrigerate at least 4 hours or until set.
  • Garnish as desired and store in the refrigerator.
Keyword dessert, pumpkin pie

French’s Green Bean Casserole

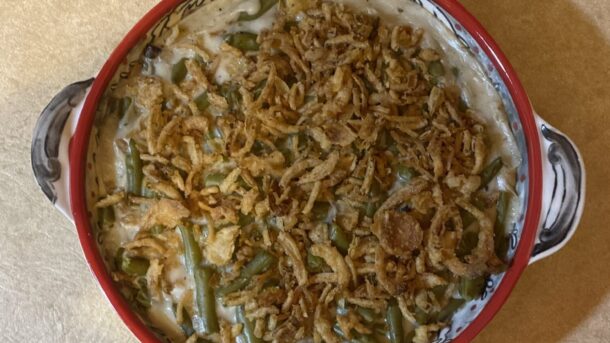
French's Green Bean Casserole

Ahh one of the staples…

French’s Green Bean Casserole is tender green beans tossed with cream of mushroom soup and topped with the always delicious French’s Crispy Fried Onions.

At the heart of this dish are tender green beans, providing a burst of freshness with every bite. These verdant gems are lovingly coated in a velvety mushroom sauce, made with sautéed mushrooms, onions, and garlic, creating a creamy indulgence that wraps around each bean like a comforting hug.

The original recipe says it makes six servings, but I usually have to double or sometimes triple the recipe 😉

This recipe is a courtesy of The French’s Food Company LLC.

French's Green Bean Casserole

French’s Green Bean Casserole

Green beans smothered in cream of mushroom soup and topped with crispy fried onions.
Prep Time 5 minutes
Cook Time 30 minutes
Course Side Dish
Servings 6

Ingredients
  

  • 1 10.5oz can Campbell's Condensed Cream of Mushroom Soup
  • ¾ cup milk
  • tsp ground black pepper
  • 2 14.5oz can green beans, any style
  • 1 ⅓ cups French's Crispy Fried Onions, divided into 2/3 cups

Instructions
 

  • Preheat oven to 305 degrees.
  • Mix soup, milk, and pepper in a 1.5 quart baking dish. Stir in the green beans and 2/3 cup of fried onions.
  • Bake for 30 minutes or until hot. Stir and top with remaining 2/3 cup of fried onions.
  • Bake 5 more minutes or until onions are golden.
Keyword 30-minutes or less, casserole

Crispy Oven-Baked Fish Fingers

Crispy Oven-Baked Fish Fingers Close Up

This recipe is a healthier take on fish sticks your kids will love. These Crispy Oven-Baked Fish Fingers cook to a golden brown in the oven so need to pull out the deep fryer. Because don’t even get me started on cleaning that deep fryer.

The tilapia is lightly coated with bread crumbs with a drizzle of melted butter. The filets create a much better fish stick experience versus “minced who-knows-what.”

Alright, before we get started…

Thaw your tilapia in the fridge the night before you plan on cooking.

Cut each filet in half down the middle to create “fingers.” Pat dry with paper towels and lightly salt filets. You will be salting again once the fish is done so don’t over do it this round.

Anytime you are going to be creating a breading for your dish, it makes the task much easier if you create an assembly line. Have large separate bowls for each the seasoned flour, the milk and egg mixture, and then the bread crumbs. Don’t use the same utensil to remove your fish from the dry ingredients as you use for dipping the wet ingredients. Keep the kitchen experience enjoyable by not making things harder than they have to be!

Some great sides to have with this dish are simple salads or any kind of steamed vegetables. You could also do a fish and chips meal and serve with fries.

Crispy Oven-Baked Fish Fingers Close Up

Crispy Oven-Baked Fish Fingers

This recipe is a healthier take on frozen fish sticks that your kids will love. Crispy, oven baked tilapia perfect for your next "Fish Friday."
Prep Time 20 minutes
Cook Time 20 minutes
Course Main Course
Servings 6

Ingredients
  

  • 2 lbs. tilapia, thawed and cut in half
  • 2 eggs, beaten
  • 3 Tbs. milk
  • 1 tsp. salt
  • ½ tsp. black pepper
  • 2 tsp paprika
  • 1 tsp garlic powder
  • ½ cup butter, melted
  • 1 cup all-purpose flour
  • 2 cups Panko bread crumbs

Instructions
 

  • Preheat oven to 425F.
  • Pat fish filets dry and lightly salt.
  • In a large bowl, combine eggs with milk. Set aside.
  • Put flour in a separate large bowl. Set aside.
  • In a third separate large bowl, combine bread crumbs with salt, pepper, paprika, and garlic powder.
  • Dredge each piece of fish in first the flour, then the egg mixture, and finally the bread crumb mixture.
  • Place fish in a single layer on baking sheet. Drizzle with melted butter.
  • Bake for 20-25 minutes, flipping halfway.
Keyword fish, tilapia